Partitioning your hard disk can be an intimidating task. I am here to guide your through it. In this guide, I will teach you various ways to create partition in Windows 11.
The methods mentioned here work on almost all Windows-operated systems.
Creating a partition in your PC helps in smartly managing your data. This is one of the main reasons why people tend to create partitions of hard disks.
If you bought a new PC or laptop, chances are that it only has a single hard disk partition. But it is not advisable to keep all your files and system files together in a single hard disk partition.
Not only do the files look disorganized, but there is also a higher chance of your data getting lost if the system crashes. That’s why it’s wiser to make partitions of your hard disk.
The number of partitions you should make on your PC solely depends on the size of the hard drive you have. If you have a larger hard disk volume (500 GB to 1TB), you can create two or three partitions, one for system files and others for personal files.
That being said, if you have a smaller hard disk volume, there is no use in creating partitions. Always ensure that the primary partition consisting of operating system files has enough space before creating any secondary partition. And always make a backup of your files before creating a partition.
Let’s not waste any time and learn how to create an SSD partition/ HDD partition in Windows 11. We will also talk about how to create recovery drives and how to merge drives in this guide.
Why do I Need Disk Partition?
It is not advisable to keep your files with system files or OS files. A separate partition for OS files can save your important files if your system runs into a major problem. In that case, you can reset your PC and this will only delete the drive consisting of OS files and not all the other drives.
Also, if you keep games & programs in the same drive that has your system files, it will reduce the performance of your PC as it slows down the PC. Creating Partition not only saves you from data loss but also helps you to organize your files.
How to Create partition in Windows 11
Creating Partition in Windows 11 is rather easy. There are many ways with which you can create partition. There are even third-party apps that allow you to create partition. But in this section, we will only talk about the methods that don’t require installing any apps.
The methods mentioned below are also quite easy to follow. Let’s look at them:
1. How to Create Disk Partition in windows 11 with Command Prompt (CMD)
We can also create partition in Windows 11 with Command Prompt (CMD). Let’s learn how to partition an existing hard drive with CMD:
Note: This method will only work if you have free (unallocated) space in your hard disk volume.
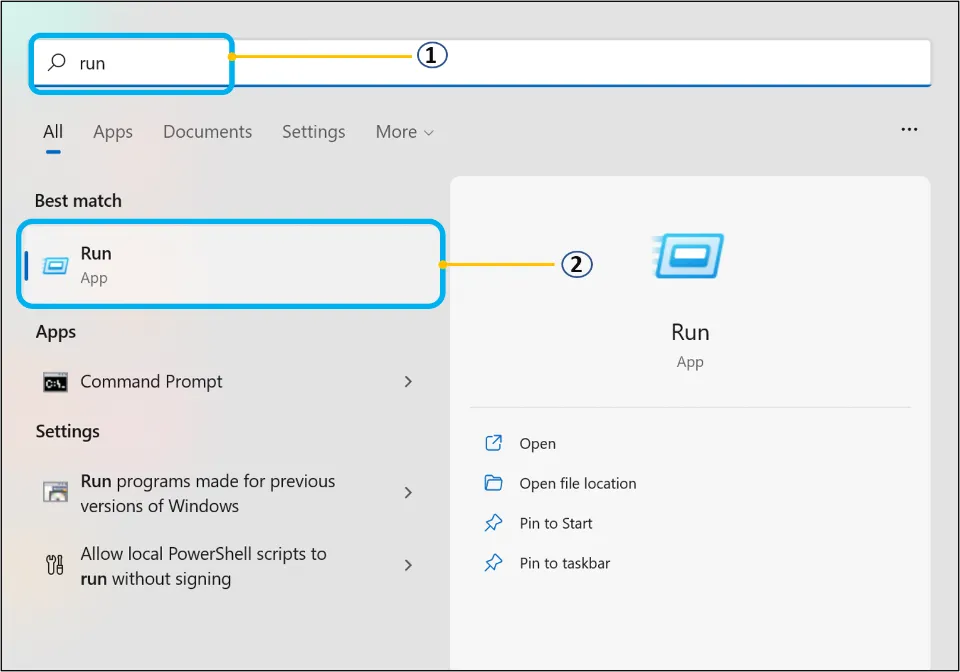
1. Press simultaneously the Win and R buttons of your PC keyboard. It will open the Run application. Alternatively, you can also search for Run application with Windows Search Tool.
2. Press Ctrl, Shift, and Enter Button on your keyboard after typing CMD.
Alternative method: Directly search for Command prompt/cmd with Windows search tool. From the right side, click Run as administrator and open it.
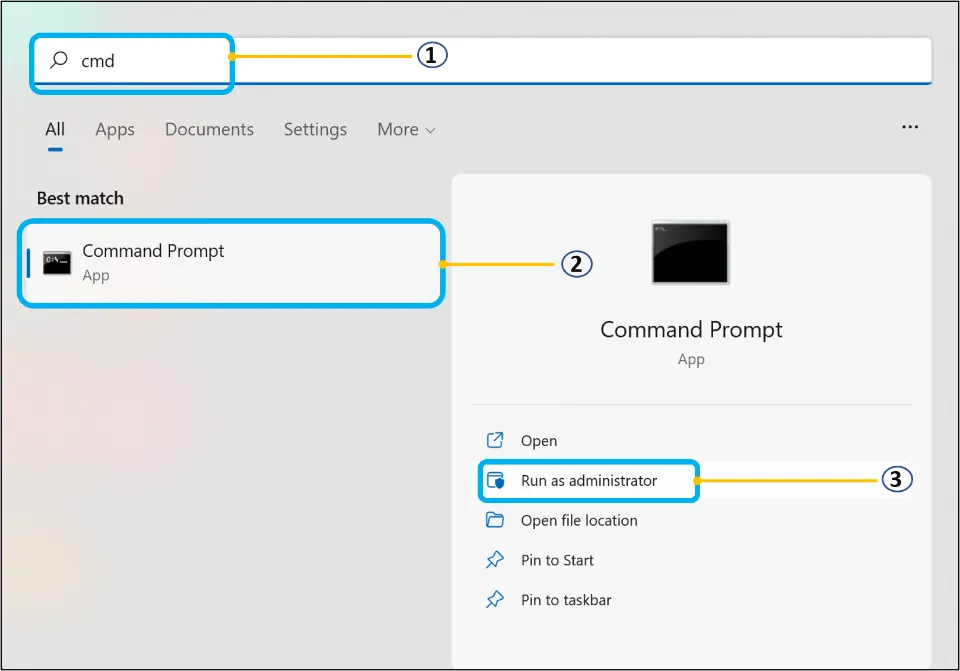
3. Choose Yes to run the command prompt as an administrator.
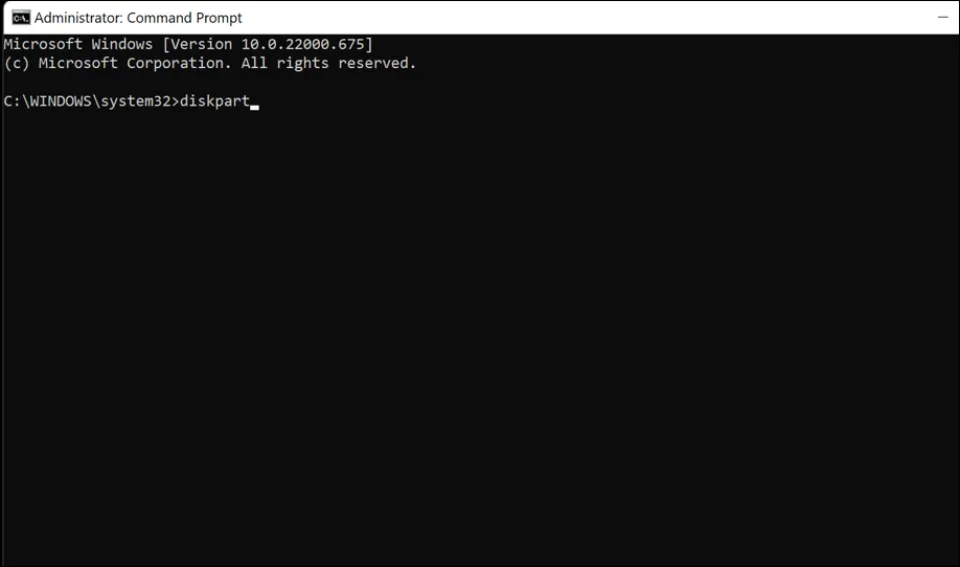
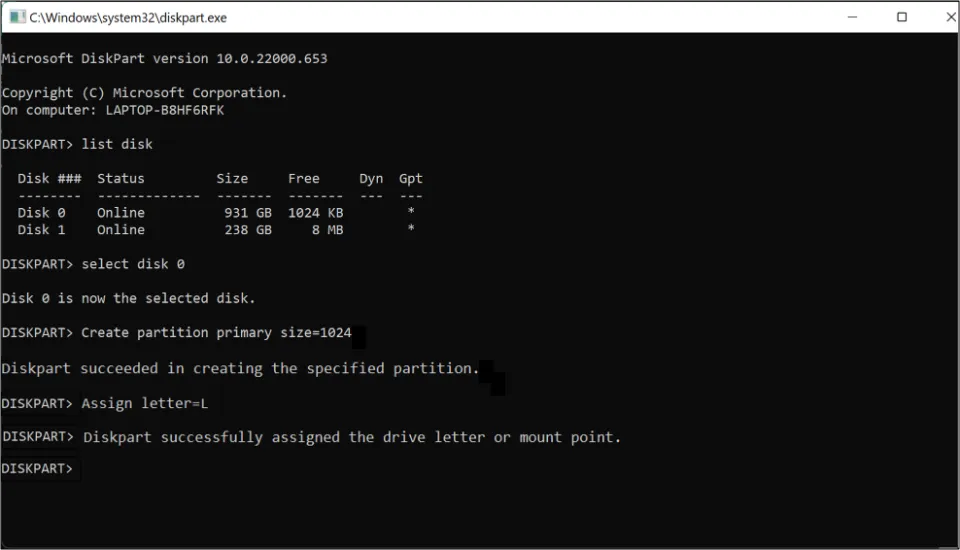
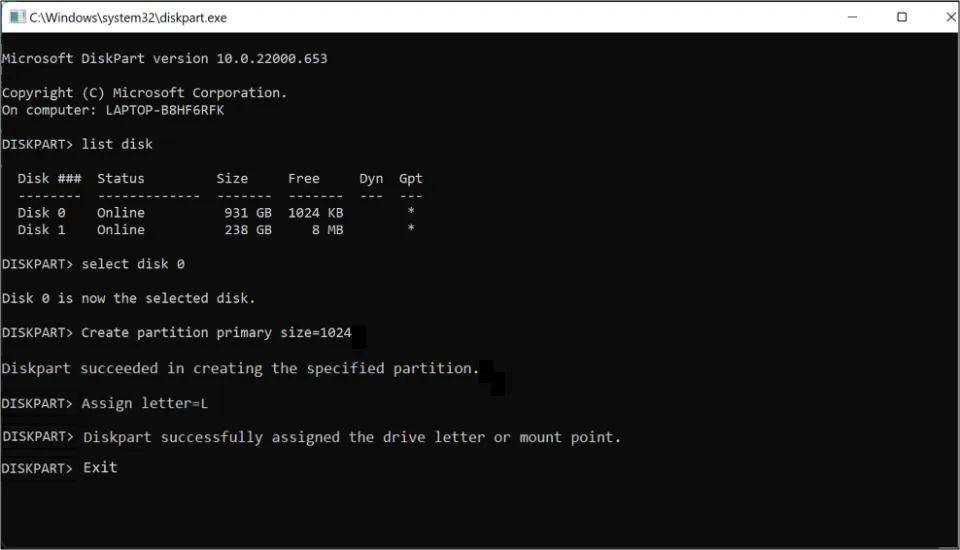
4. Type diskpart and press Enter on the keyboard
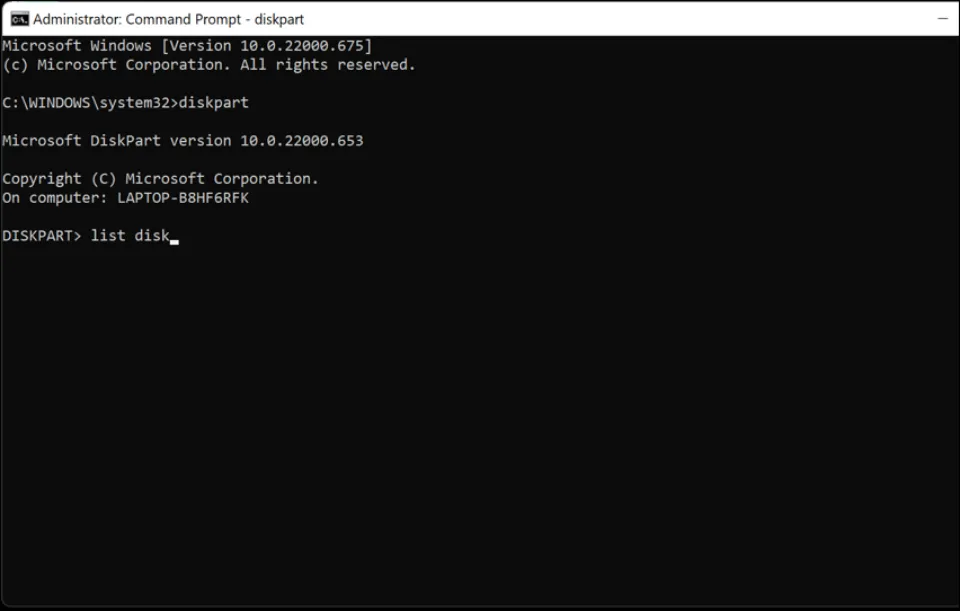
5. Then, press Enter after typing list disk.
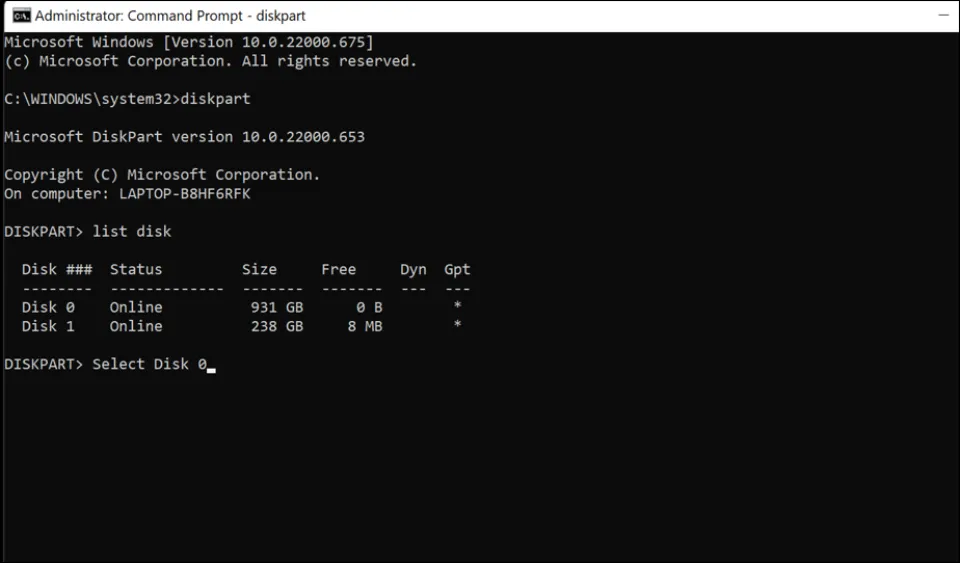
6. You will now notice all the disks available on your PC. Spot on which disk you want to make partition.
7. Now, type Select Disk Y (where Y represents the number of disk of the disk in which you want to make partition) and press Enter again.
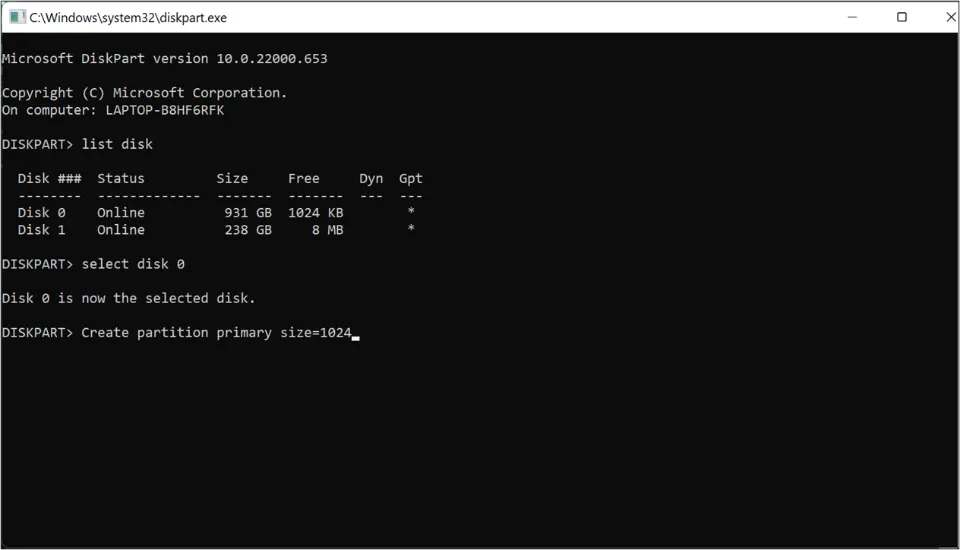
8. Then, type Create partition primary size=Z {where Z represents the size of the partition in MB (MegaBytes) you want to create} and press Enter.
Note: If you want to create a partition of 1 GB size, type 1024 in place of Z. So, if the size you want is X GB, then type X*1024 (multiply X with 1024).
9. Press the Enter Button on the keyboard after typing Assign letter=L (where L represents the name of the drive). Make sure you choose a drive letter that is not already assigned.
10. Finally, type Exit and press Enter.
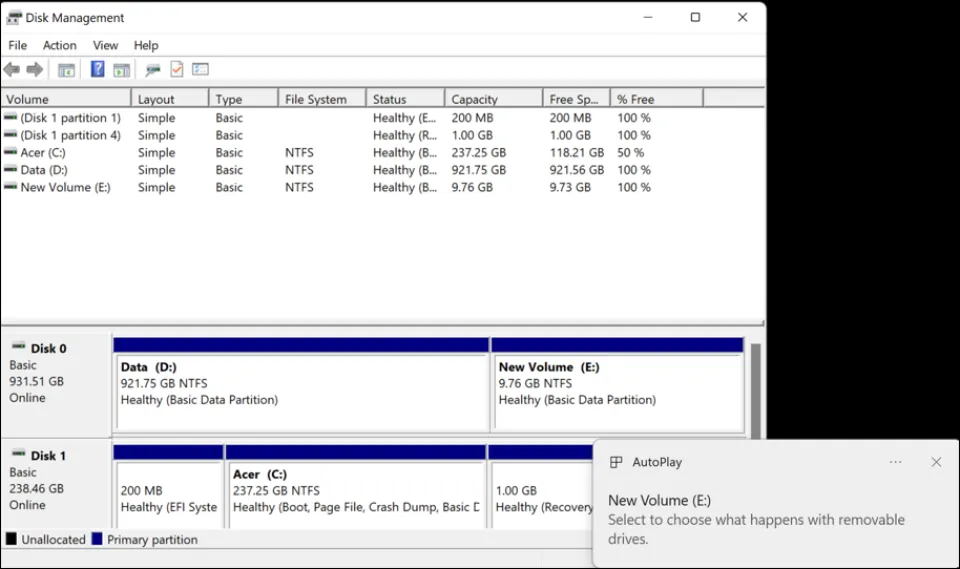
2. How to Partition a Hard Drive with Disk Management
Disk Management is a Windows utility tool that allows to manage or perform advanced storage tasks. This includes shrinking, extending, deleting, and renaming hard disk volume. Let’s learn how to partition and format a hard drive with Disk Management tool:
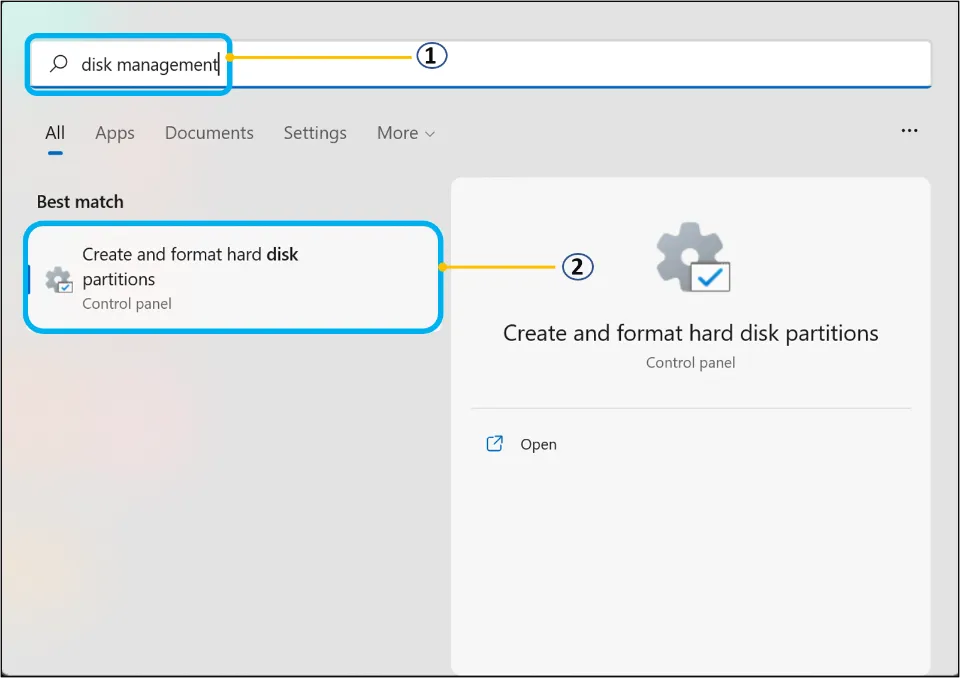
1. Search for disk management using Windows search tool. Then, select Create and format hard disk partitions to open it.
Note:
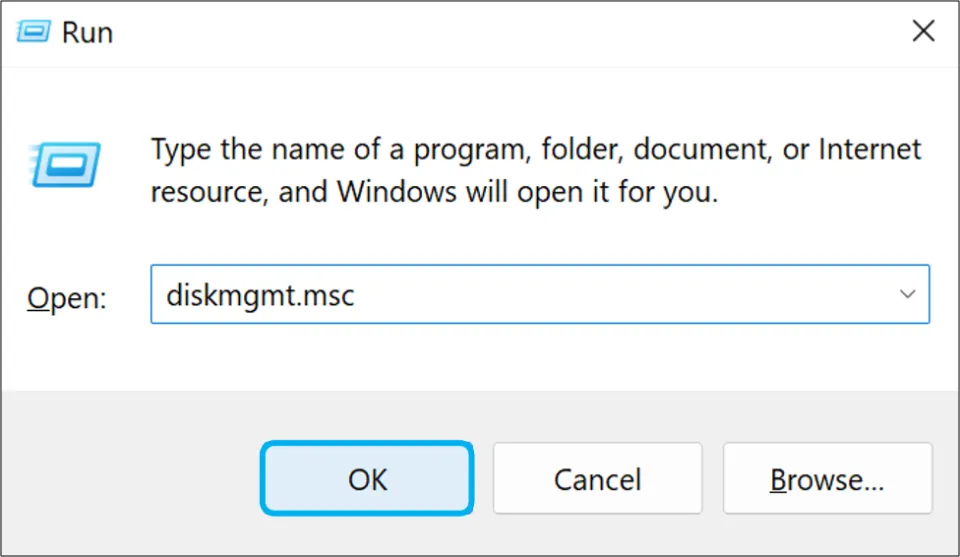
a) Alternatively, you can open Run app by pressing Win and R buttons simultaneously. You can also search for Run app directly from Windows search tool and click the app to open.
b) Type diskmgmt.msc and click OK.
2. To create a new partition on your hard disk, you have to create unallocated space first. And to create unallocated space, you have to shrink the volume of your hard disk.
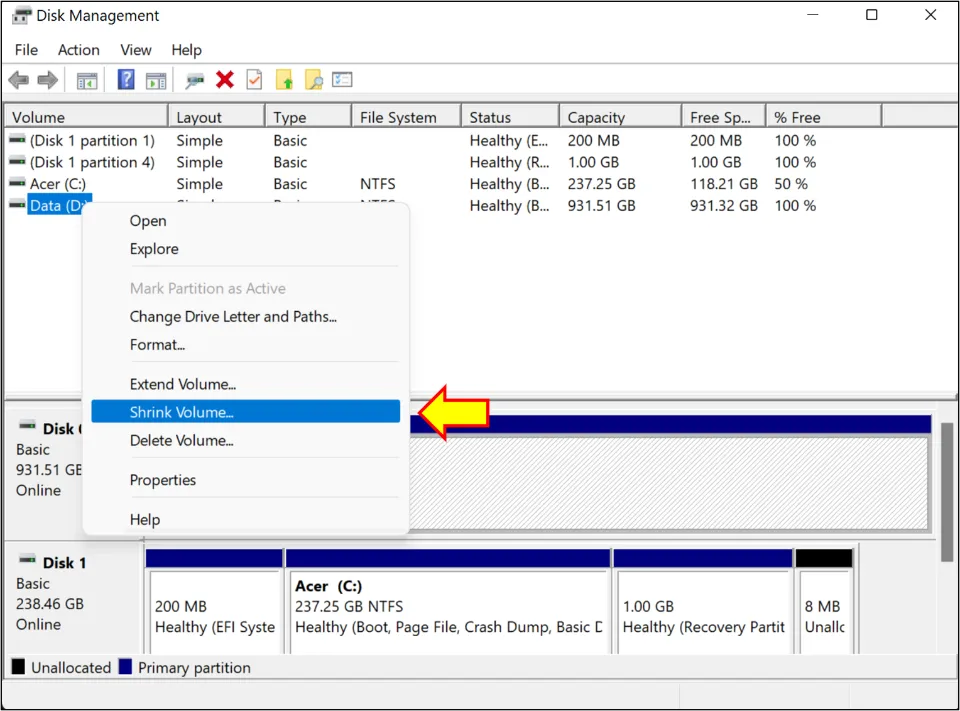
3. Choose the hard disk on which you want to make partition. Right-click your mouse and select Shrink Volume.
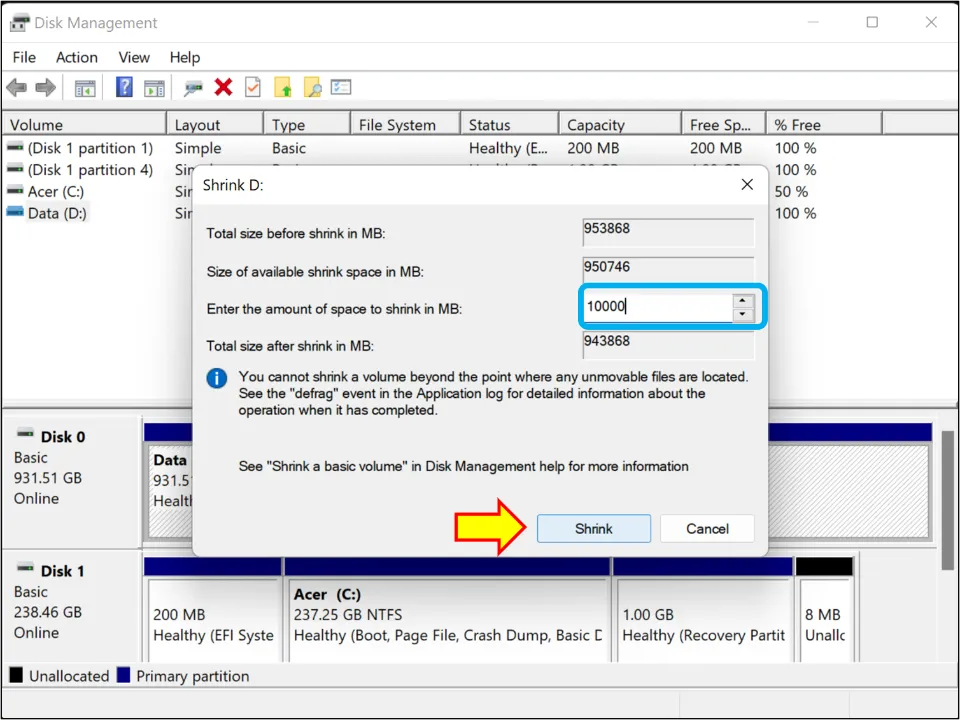
4. Type the shrink size in MB and hit Shrink.
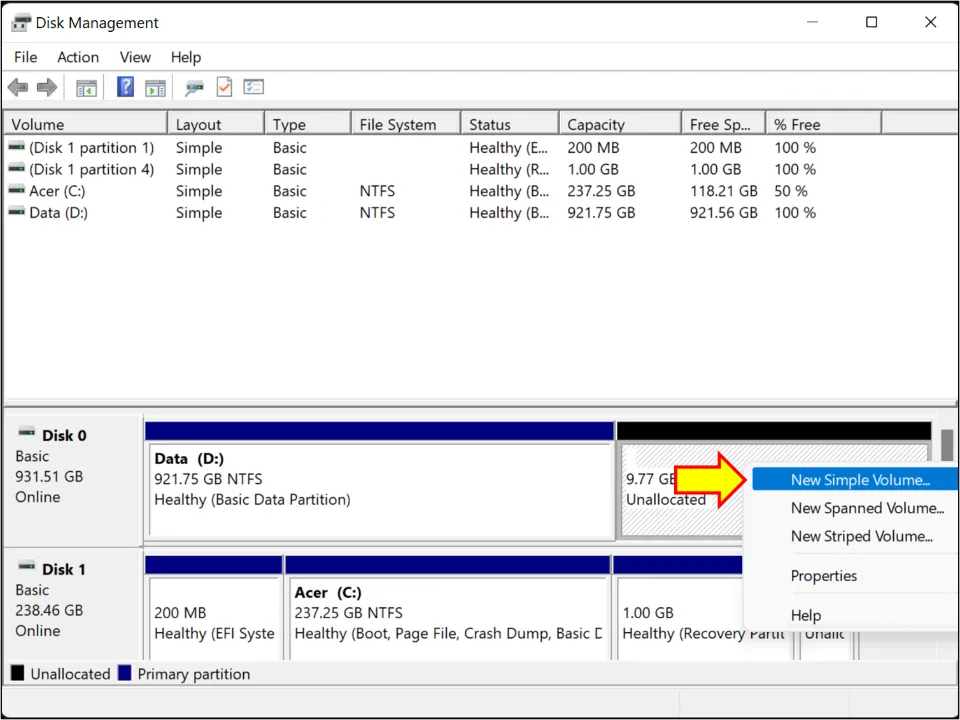
5. You will now notice an unallocated space next to the hard disk. Right-click the unallocated space and select New Simple Volume.
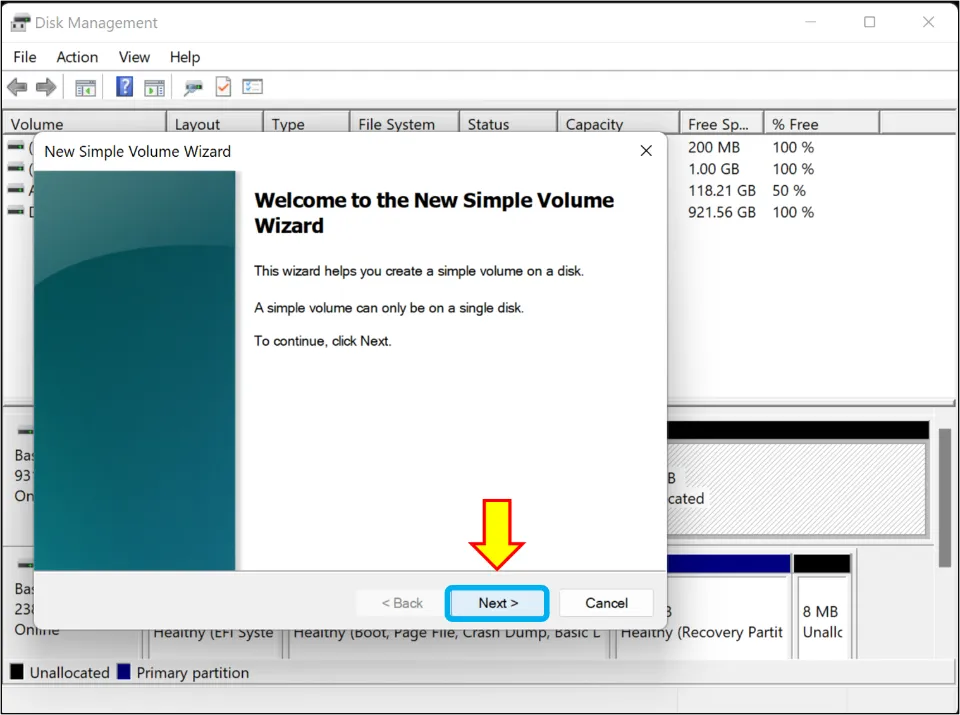
6. New Simple Volume Wizard will open. Click Next to proceed further.
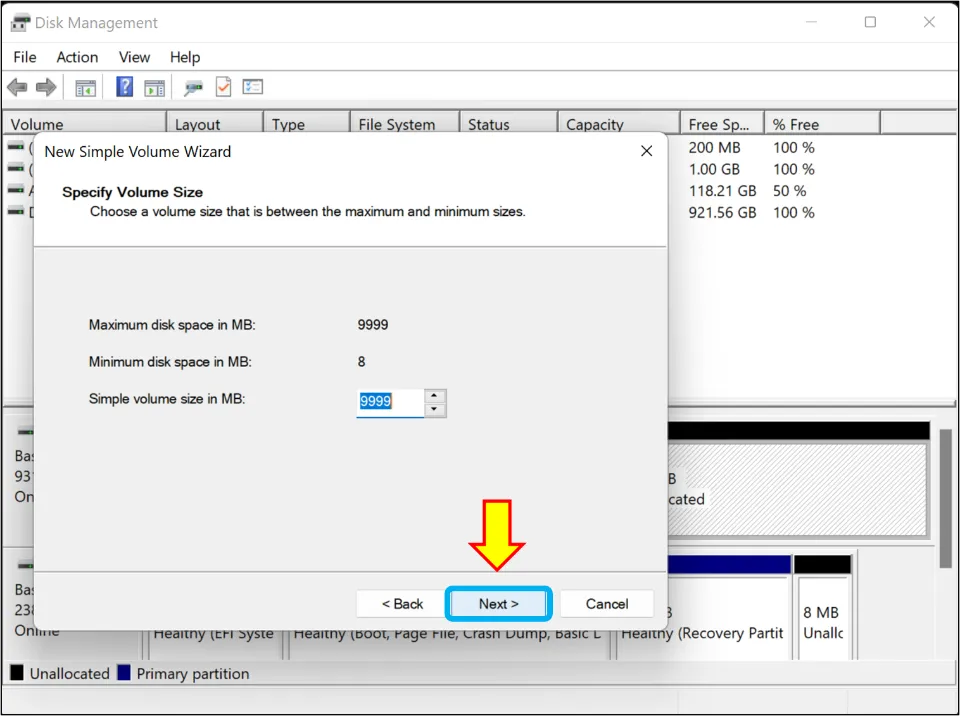
7. Type the size of simple volume in MB and then select Next.
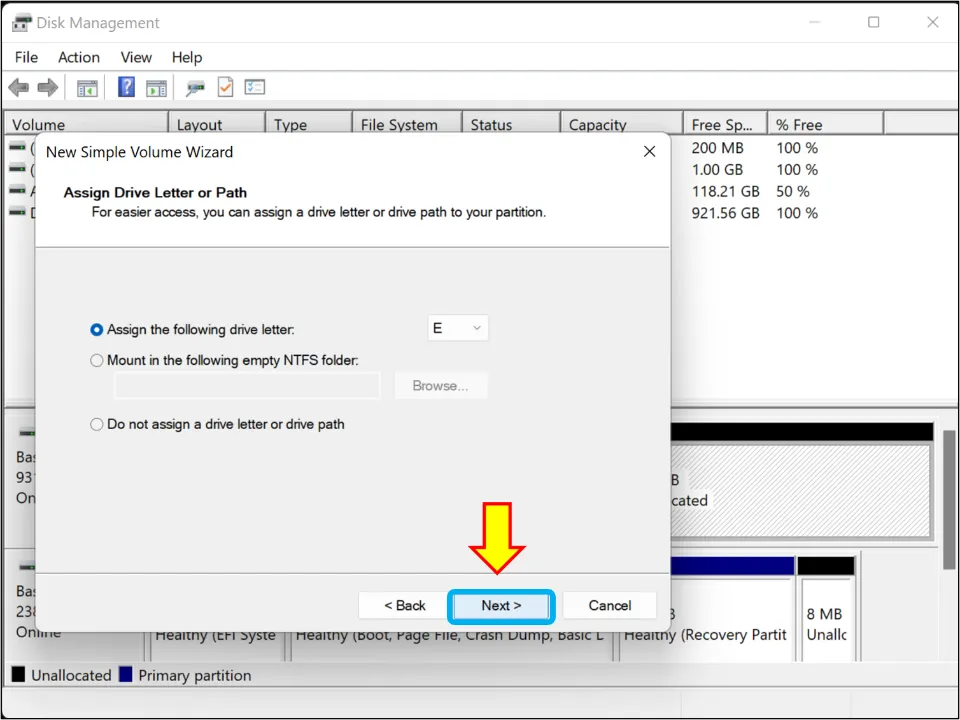
8. Then, assign a drive letter. Hit Next. (Just make sure that you don’t assign a drive letter that is already in use. )
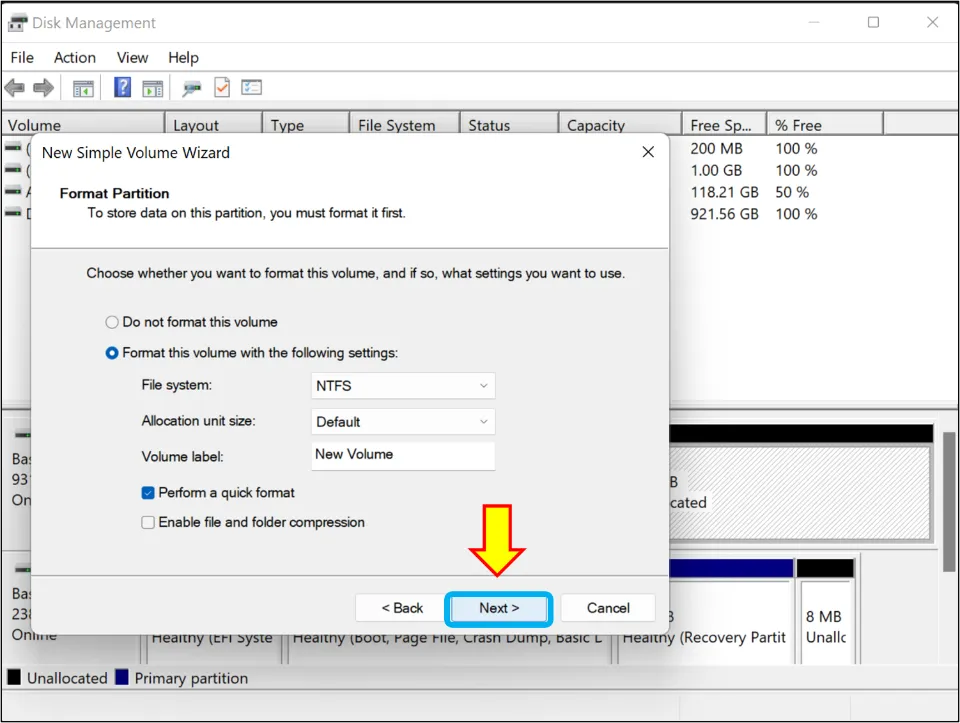
9. Select whether you want to format the volume. It is preferable to choose formatting the drive for smooth partition creation. Make sure the format is of NTFS format. You can tick the quick format checkbox for quicker formatting. Then, select Next.
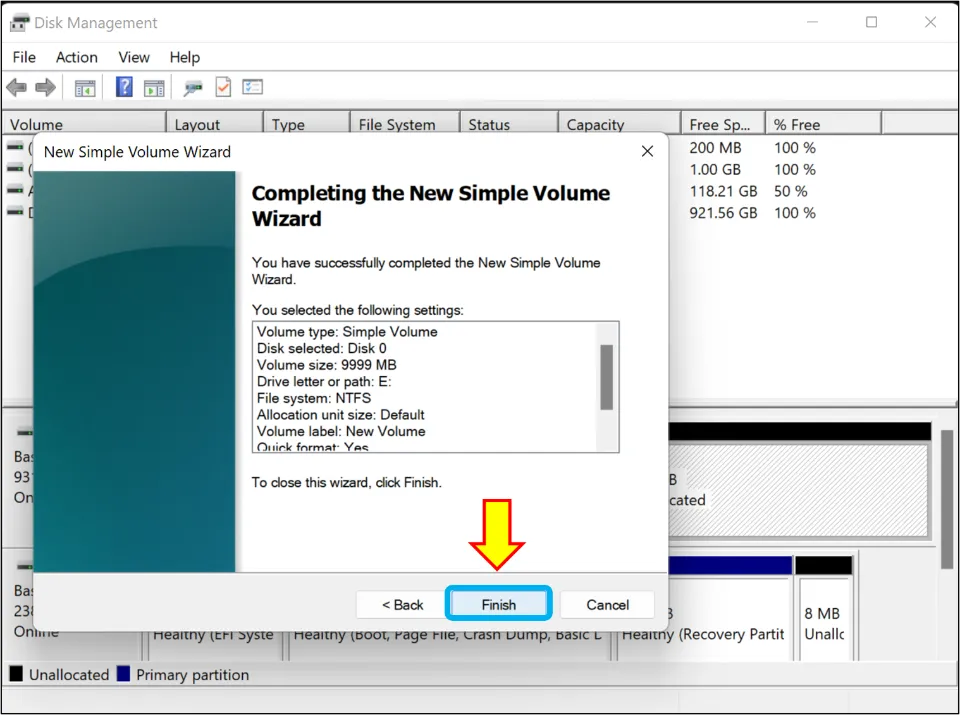
10. Finally, hit Finish.
11. The newly created hard disk volume will be visible now on Disk management app.
How to Merge Drive with Disk Management
There are times when you want to merge your drives. This helps in saving unutilized space that can’t be used otherwise. Make sure you have backed up your files before merging drives. Let’s learn how to merge drives with Disk management.
Note: When we are saying that we are merging two drives, we are actually deleting one drive, creating unallocated space, and then extending the volume of the other.
For ease of understanding, we are going to divide the steps into two parts.
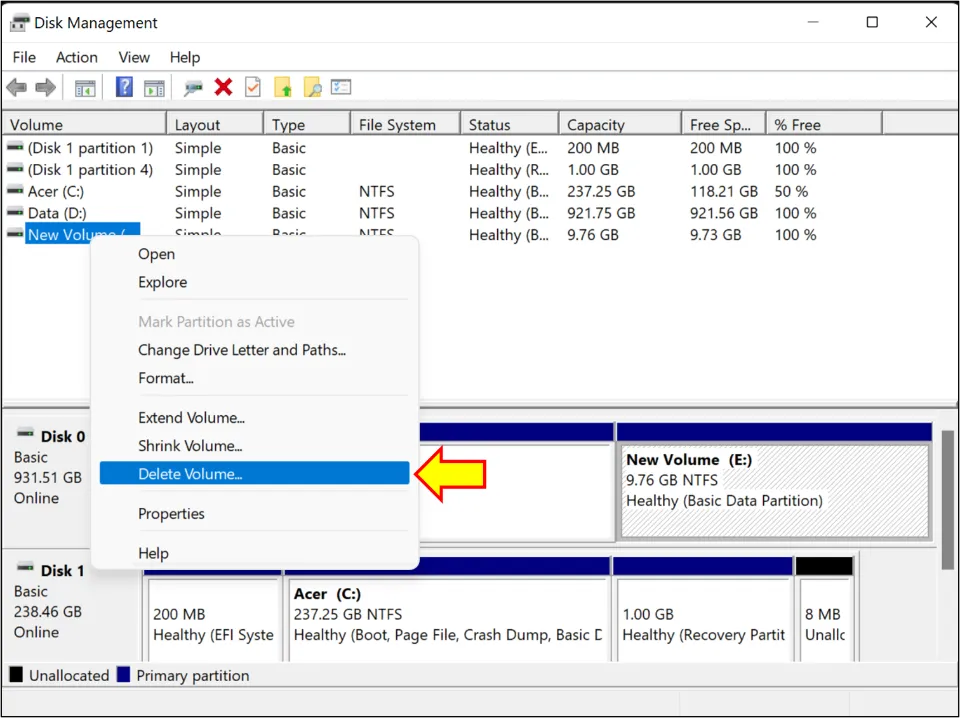
1. Deleting Hard disk Volume:
In order to merge drives, we have to create unallocated space. And, this can be achieved if you delete a hard disk volume. Let’s check the steps:
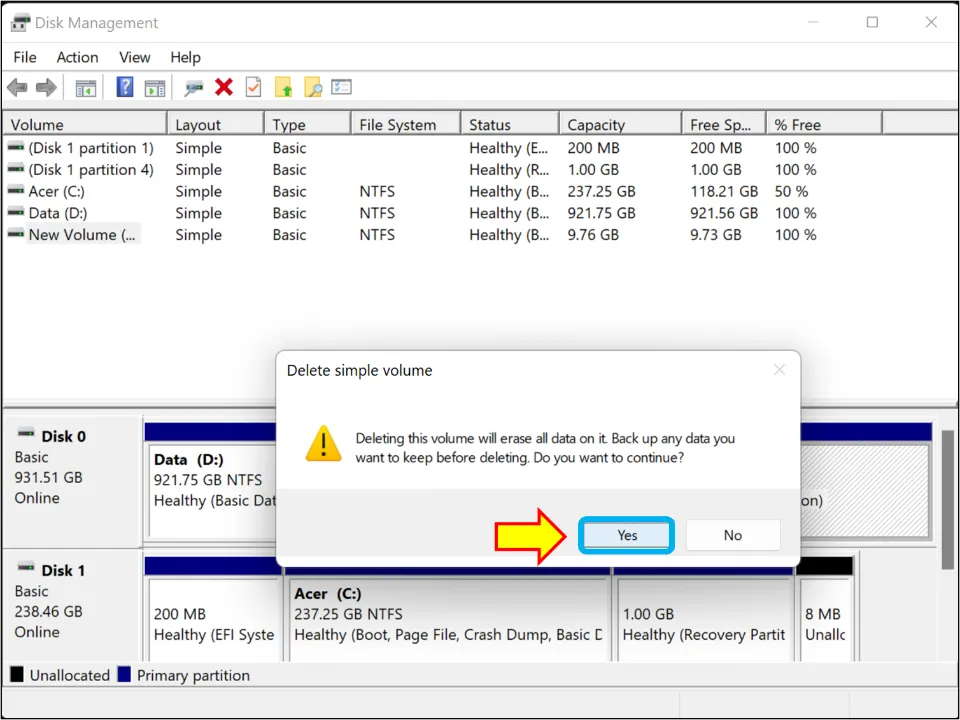
1. Choose the hard disk volume you want to delete. Right-click your mouse and select Delete Volume.
2. A warning message will appear. It will ask you to back up your files before deleting the volume. Hit Yes.
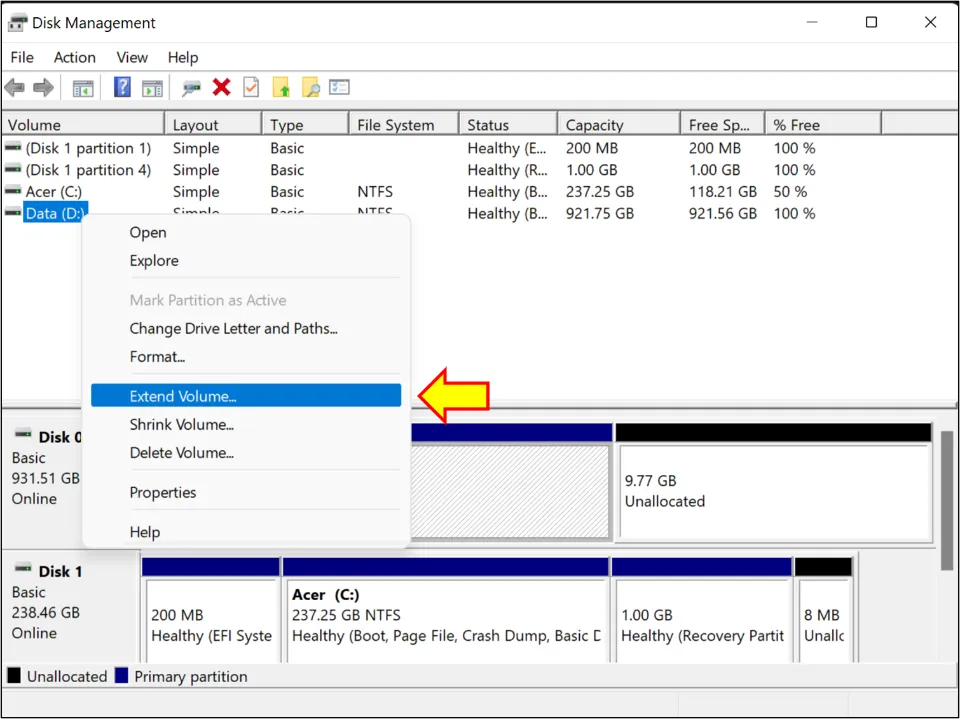
2. Extending Hard disk volume:
Now, that you have deleted a volume and created unallocated space, all you need to do is to extend the volume of your desired hard disk. Let’s check out the steps:
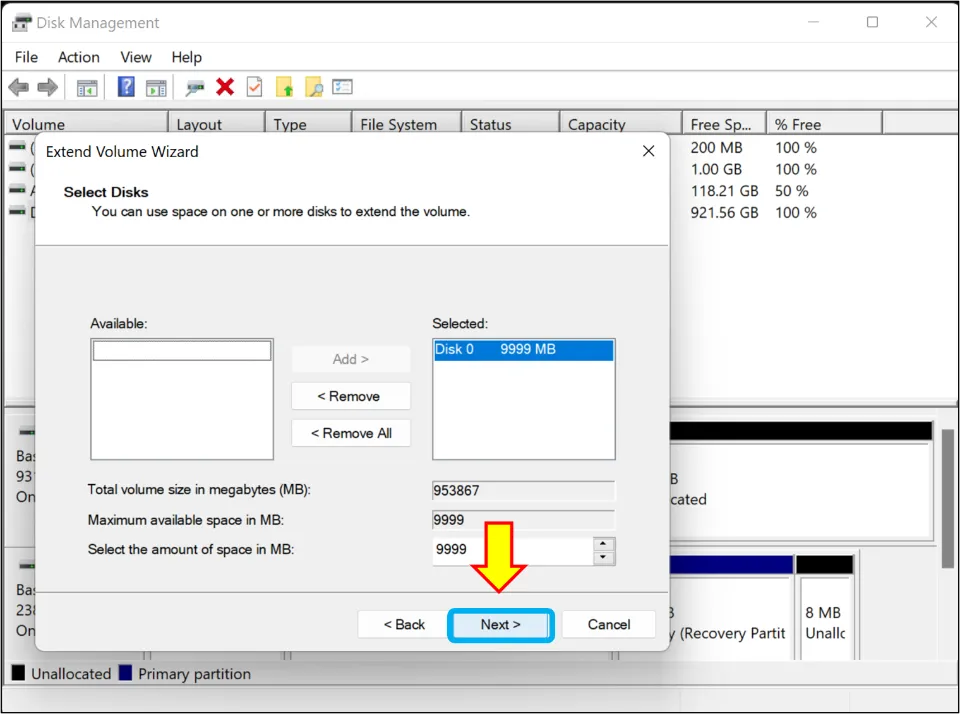
1. Choose the hard disk you want to extend. Right-click your mouse and select Extend Volume.
2. Extend Volume Wizard will open. Click Next to proceed further.

3. Type the amount of space in MB and then click Next.
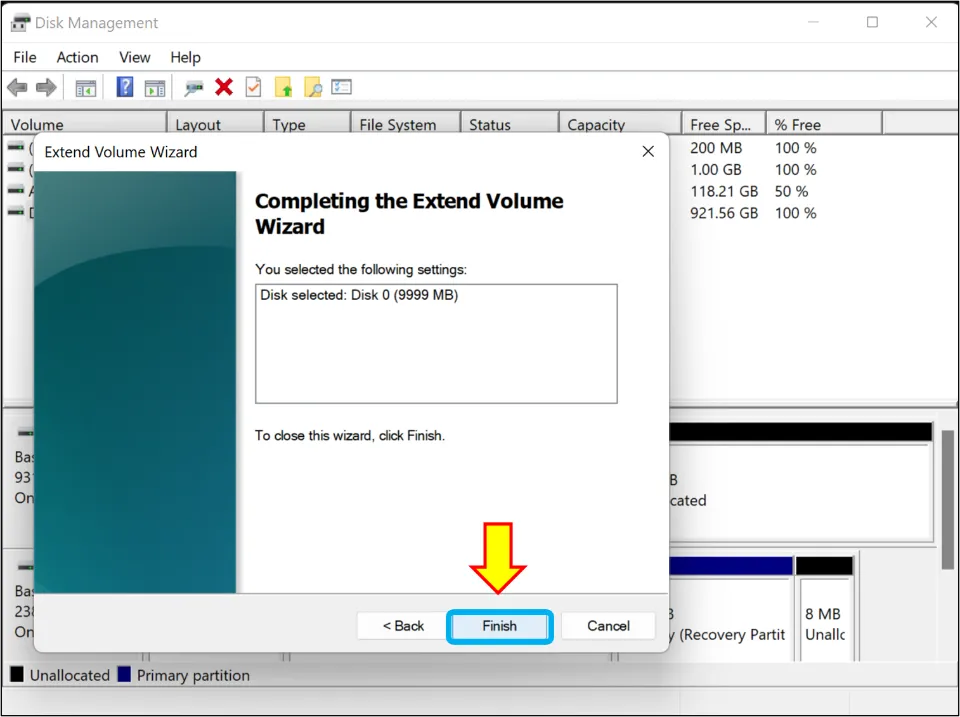
4. Finally, select Finish.
3. How to Make Partition in the Hard Disk from Windows Settings
You can also make partition in Windows 11 from Windows Settings. Let’s learn how to create partition in Windows 11:
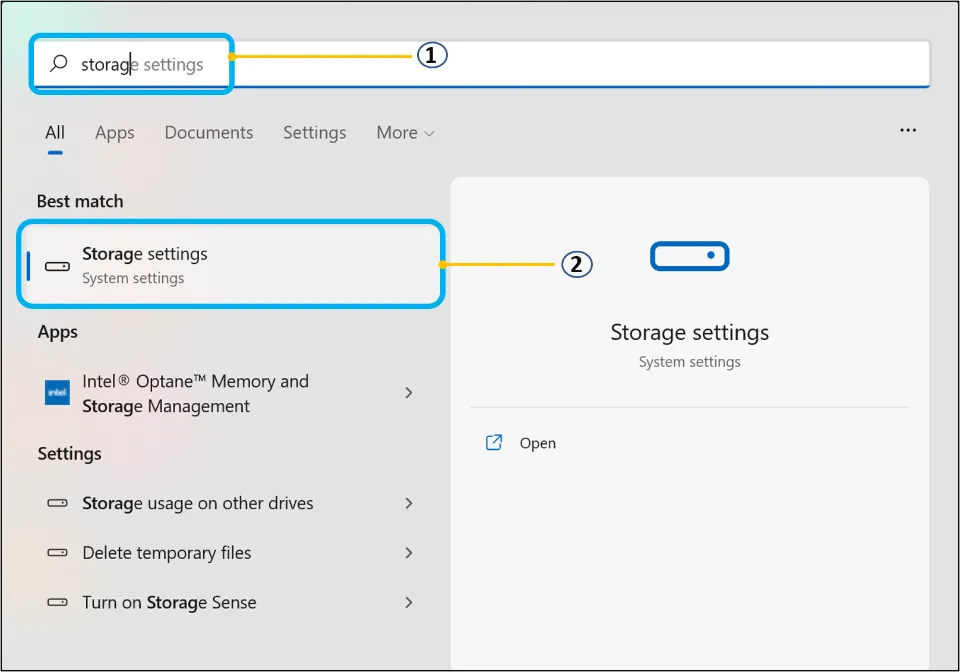
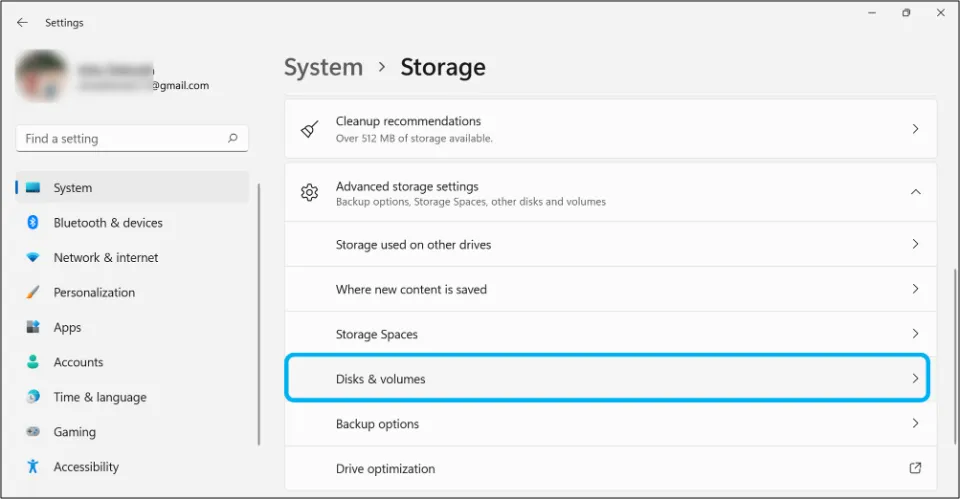
1. Search for Storage Settings with Windows search tool. Click the resulting option to open it.
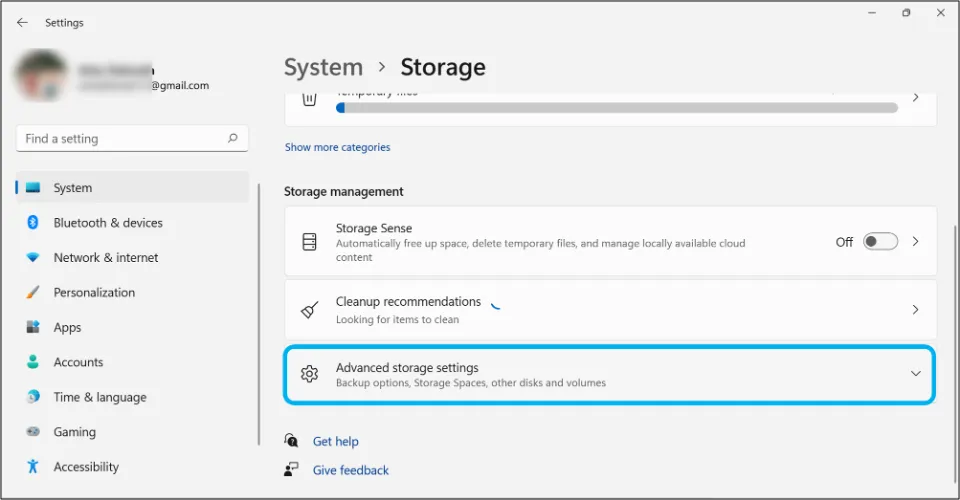
2. Select Advanced storage settings.
3. Hit Disks and volumes.
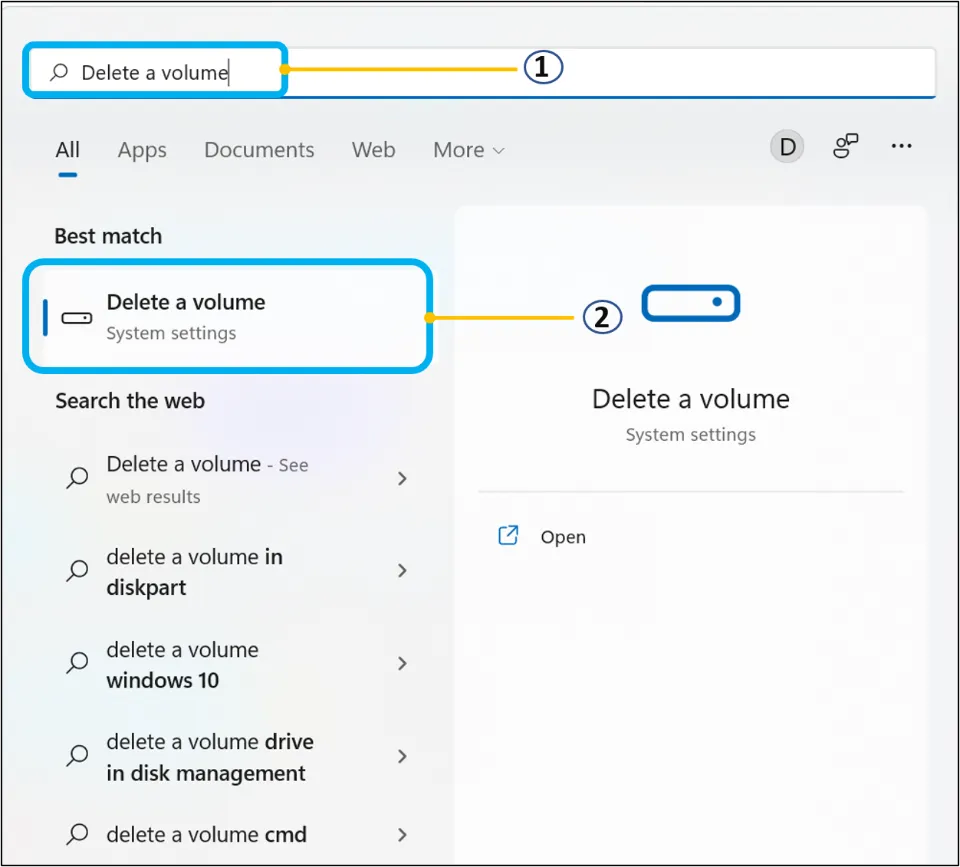
Alternative method: Directly, search for Delete a volume in Search tool. Click Delete a volume option. This will open Disks and volumes.
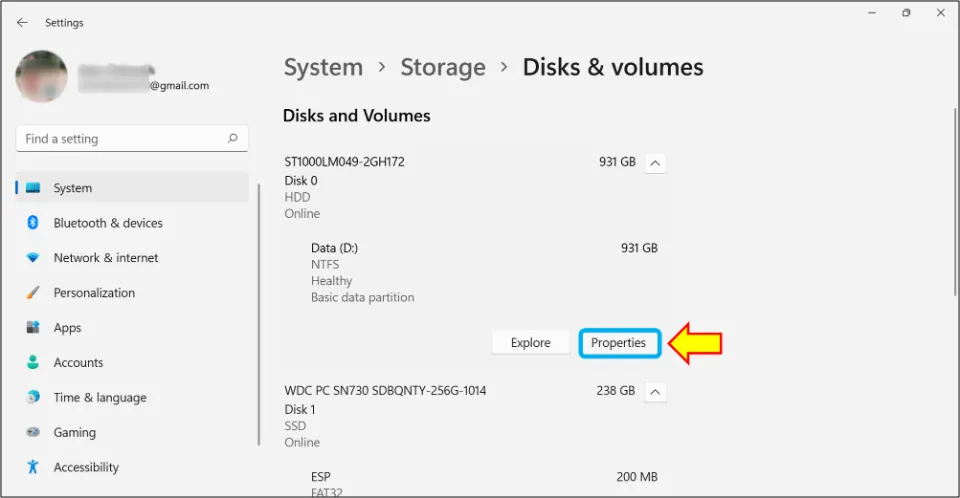
4. Like all the other methods mentioned above, you have to shrink volume of an existing hard disk to create unallocated space.
5. Choose a hard disk volume and select it. Then, click Properties.
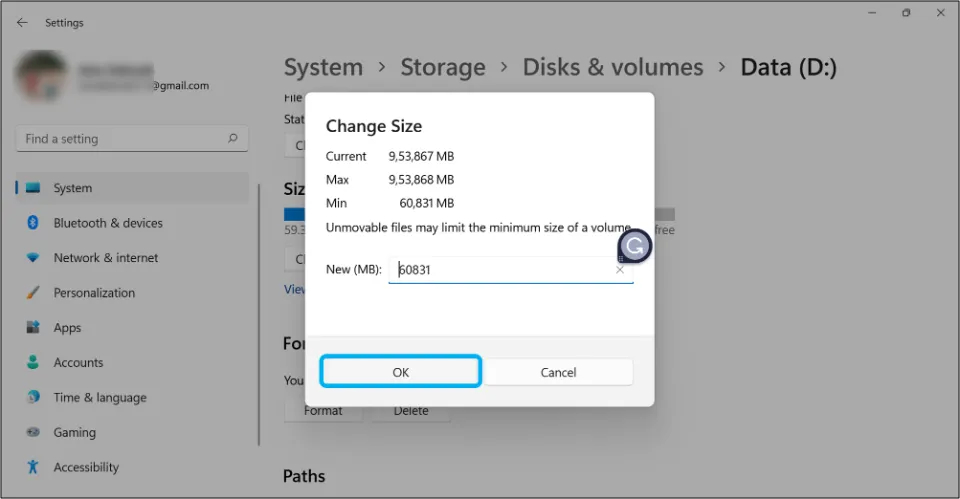
6. Select Change Size.
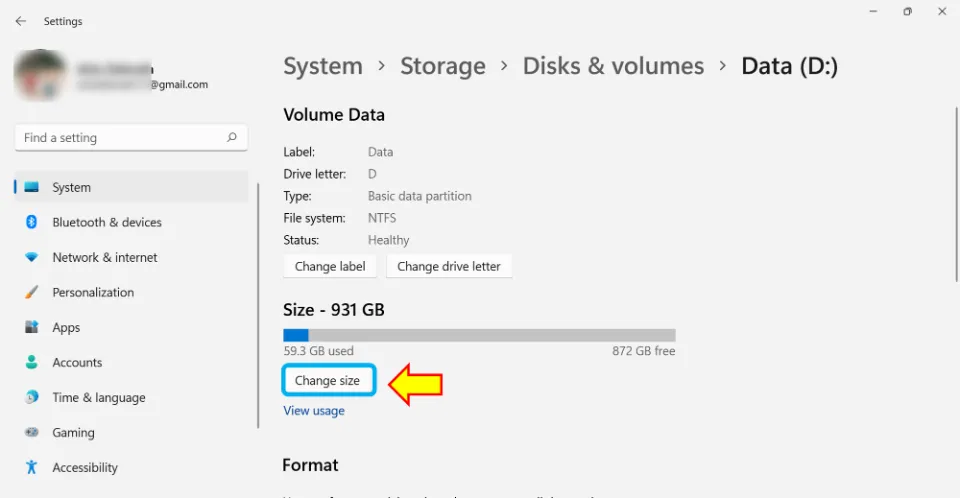
7. Enter the new size in MB and then click OK.
Note:
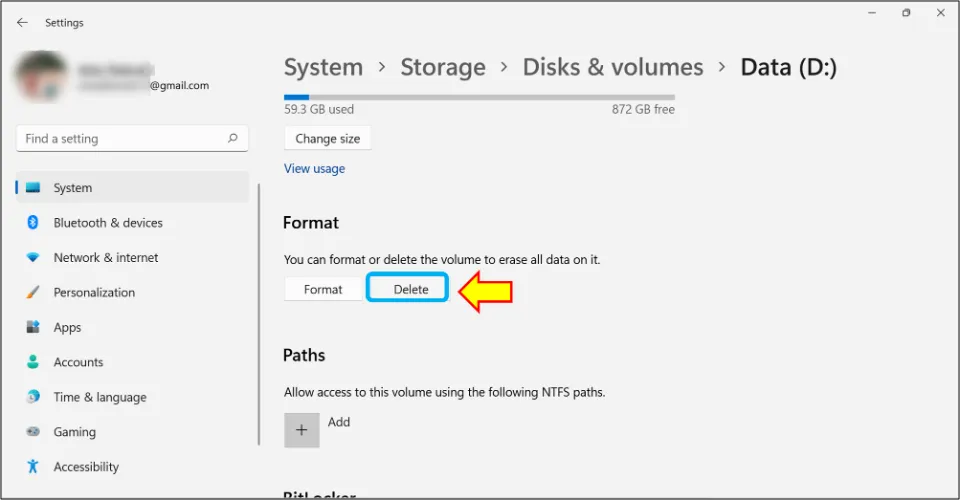
a) The method mentioned above (Change Size) can also be used to extend hard disk volume. Just make sure that you have unallocated space.
b) To Delete a volume and create unallocated space, click Delete
8. The unallocated space created will be visible now. Simply, click it and hit Create Volume.

9. Give a label name (e.g. Data), choose format type (NTFS), and assign a drive letter. Then, click Format.

4. How to Create Recovery Partition in Windows 11
Creating a recovery drive for your PC is a good practice. Recovery drive creates backup of system files. This allows you to easily reinstall Windows in case your computer ran into a major problem.
Also, if the PC doesn’t start, you can use it to reinstall Windows. It is to be noted that your files and passwords will not be backed up if you create a recovery drive. That means that you have to separately back up your data.
Since Windows keeps updating its system regularly, we recommend creating a recovery drive once a year at least.
Prerequisites for Creating Recovery Partition:
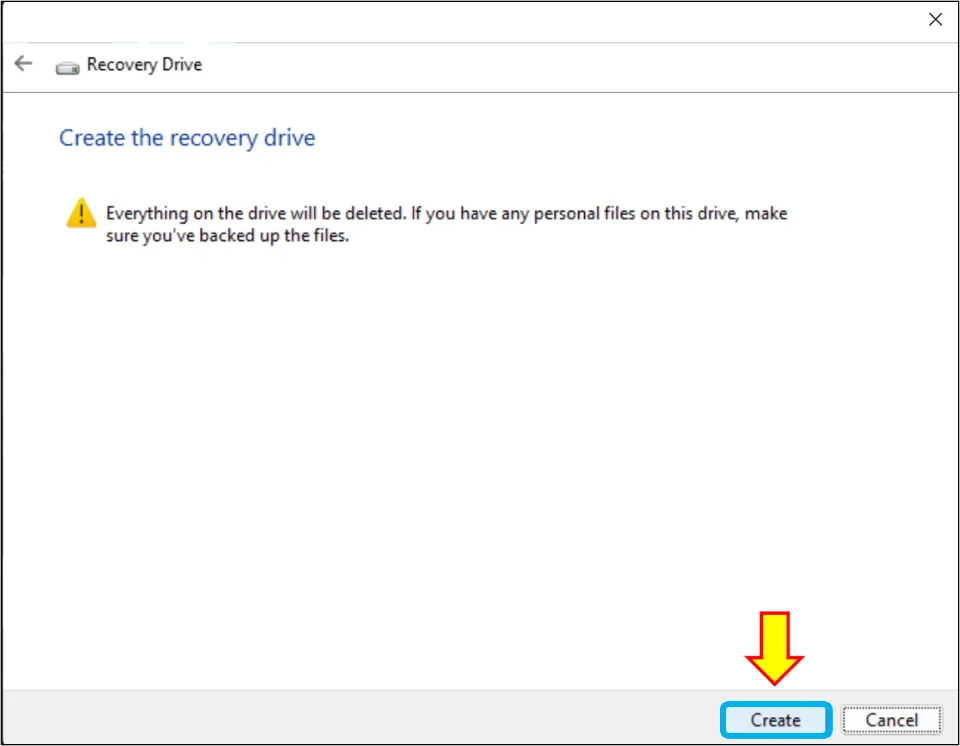
a) Back up your USB drive/hard disk before creating a recovery drive on it. Because all the data in the drive will get deleted in the process.
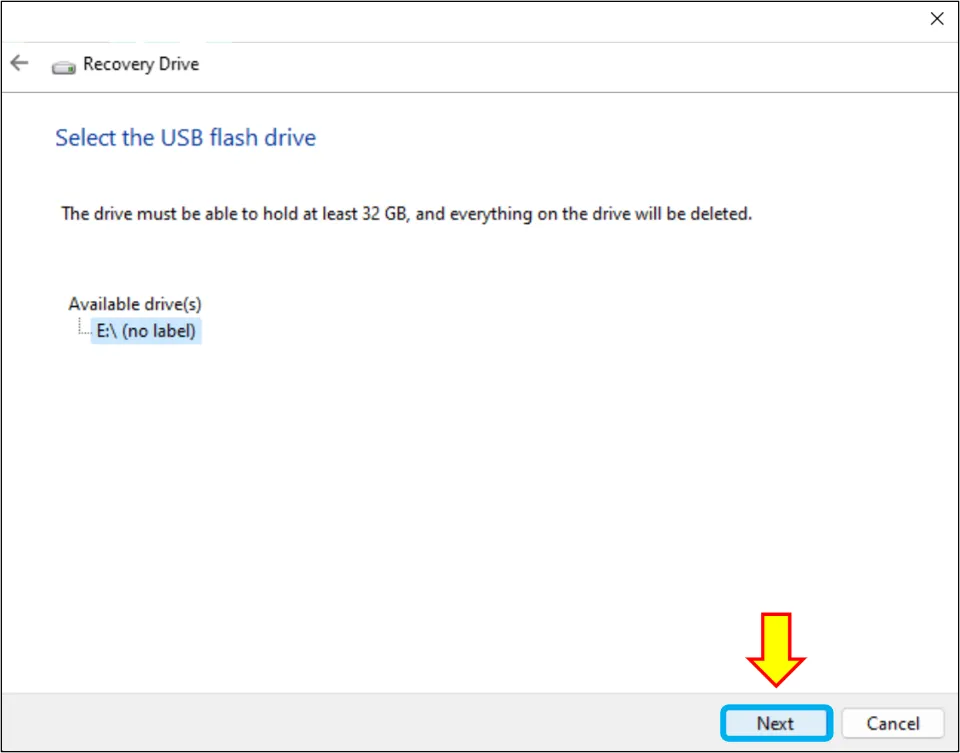
b) The USB drive or hard disk should have a minimum space of 32 GB.
Let’s learn how to create recovery partition in Windows 11:
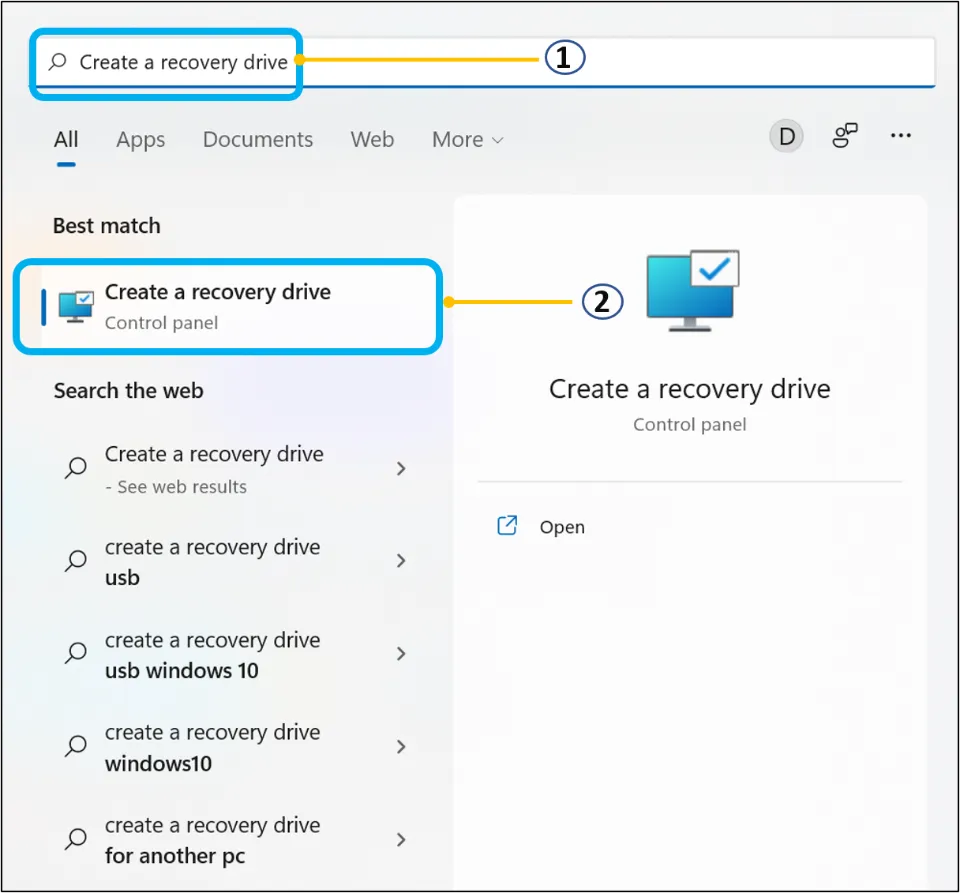
1. Plugin a USB drive or a hard disk into the PC.
2. Use Windows search tool for searching Create a recovery drive. Select the resulting option to open it.
3. Select Yes when asked if you want to allow this app to make changes to your device.
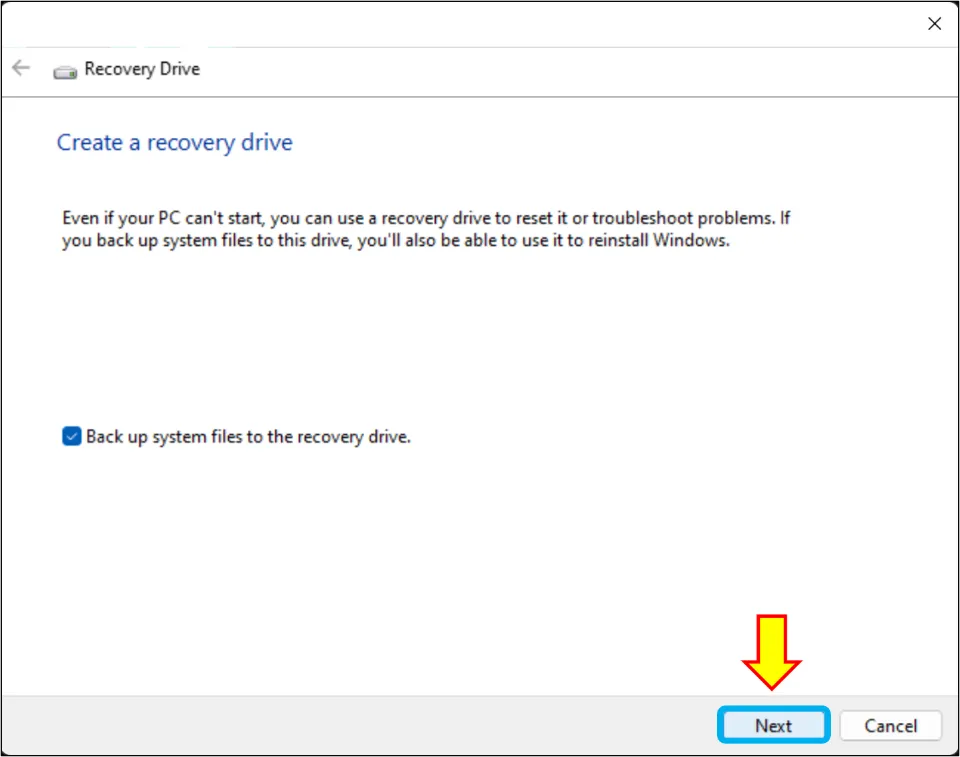
4. Ensure that you have ticked the checkbox that asks for backing up of system files in the recovery drive. Hit Next.
5. Choose the drive you inserted into your PC and click Next.
6. A warning message will tell you to back up your files. Hit Create.
7. Wait till the process is completed. You will be notified once it’s completed.
Summing Up
Windows packs enough tools to create partitions and hence you don’t need any third-party tools to create partitions. One must you should always do before creating a partition is to back up your files because your data files will be removed in the process. The Disk Management tool is by far one of the easiest ways to create a partition.
Hope this article has successfully taught you how to partition a new hard drive. If you still have any queries, don’t shy away to drop your questions in the comment box.
Frequently Asked Questions
How do I create a new/primary partition in Windows 11? / How do I add a drive in Windows 11?
To create a new partition: Launch Disk management tool. Choose a drive and right-click it to hit Shrink volume. Enter the size you want to shrink. Click Shrink. Select the unallocated space. Right-click it and hit New Simple Volume. Enter volume size and hit Next. Next, choose whether you want to format the drive and assign a drive letter. Click Next. Finally, select Finish when the process is complete.
How can I partition my C drive in Windows 11 without formatting? /How can I partition my hard drive in Windows 11 without losing data?
Open Disk management on your PC and select the hard disk you want to create a partition on. Right-click your mouse and select Shrink Volume. Type shrink size and select Shrink. Right-click the unallocated space you just created and choose New Simple Volume. Type simple volume size and click Next. Now, instead of choosing to format the drive, choose to not format. Click Next and finally select Finish to complete the process. I will still recommend that you back up all your data before making a partition. It will ensure that you still have your important data in case of any data loss in the process.
What do I need to do before creating partitions on a hard drive?
You should create a backup of your important files before creating partitions on a hard drive.
Can you partition a drive without losing data?
Yes, you can partition a drive without losing data. But backing up data is still recommended as a precaution.
Why do I need partitions on a hard disk?
Creating partitions allows you to effectively organize all your files, be it system files or personal files. Also, it reduces the chance of data loss in case of a system failure.